Google Shopping has the potential to produce one of the highest returns on investment (ROI) for ecommerce retailers advertising online. For those new to online marketing, that is a good thing, in fact, perhaps the most important thing!!! A high ROI means that the money that is invested in a marketing channel is generating a high return of sales for the investment.
ROI Calculation = (Gain from investment – Cost of Investment) / Cost of Investment
Over the last few years, I have consistently seen client’s Google Shopping campaigns attain a higher ROI than that attained from either Google Search or Display (retargeting) advertising making it an important part of Google advertising for ecommerce retailers. However, being able to achieve a really high ROI can typically only be attained by using advanced techniques such as segmenting Google Shopping campaigns, which this article is dedicated.
A Quick Review – How Google Shopping Works
Google Shopping results are displayed at the very top of the page before the organic listings (as seen in the example below). Google Shopping results can also be viewed by clicking on the Shopping tab in the upper menu next to the default ‘All’ link.
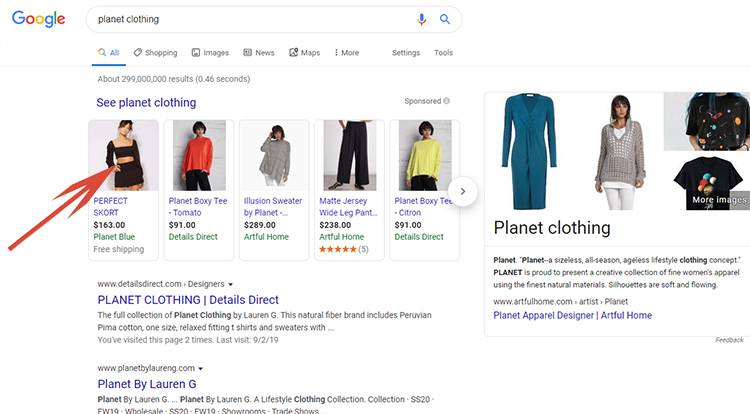
Google uses a real time auction system just like search results to list products in Google Shopping. In order for products to appear, they must be included within a merchant’s approved Google Merchant Center Account. The Merchant Center account must also be actively linked to an active Shopping campaign within the Google Ads interface. For directions on how to get started with Google Shopping, see my article Google Shopping – What It Is, How It Has Changed.
Once connected to a Google Merchant Center account containing approved products, Google Ads allows advertisers to optimize their listings based on populated fields contained within their submitted products. For detailed information on what different fields Google supports, read this article – Top Tips To Optimize Google Shopping.
In addition, Google also allows advertisers to add promotions to their Google Shopping listings, which is another great way to increase click through rates (CTR). Note, Google promotions are added through the Merchant Center account as well and not within the Google Ads interface. For those wanting to learn more about promotions, I have an article dedicated to Google promotions as well – Enhancing Google Shopping With Promotions.
However, even if you have a Google Shopping campaign that is being optimized and you are running meaningful promotions, there remains a problem. If all Shopping listings are contained within the same campaign, advertisers are restricted because they must have the same settings across the entire campaign.
What this means for advertisers is that they can of course adjust bids on the campaign as a whole based on location, ad schedule, devices, but what if they want to change settings thus effecting bids on different products or a category of products? Of course, they cannot if all of their products are contained within a single campaign.
This is why segmenting Shopping campaigns is essential for many retailers if they wish to fully optimize their Google Shopping listings based on location, time of day or devices. One of the more advanced techniques for those just starting to use Google Shopping, segmenting Shopping campaigns can improve Shopping results and provide advertisers a distinct advantage over their competitors.
Creating Multiple Google Shopping Campaigns
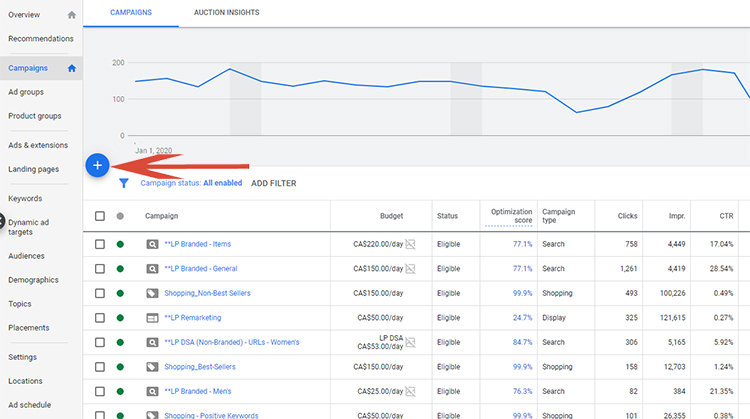
The first step in creating a new Shopping campaign containing a sub-section of a feed’s product offerings is to create a new Shopping campaign. In order to do so while in the Campaigns view click on the blue plus button and select New Campaign.
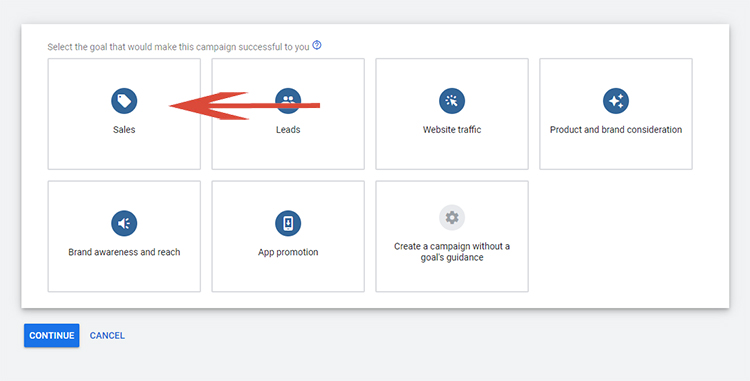
Next, you will select the campaign’s goal. For Shopping campaigns, you will select ‘Sales’ and the blue ‘Continue’ button.
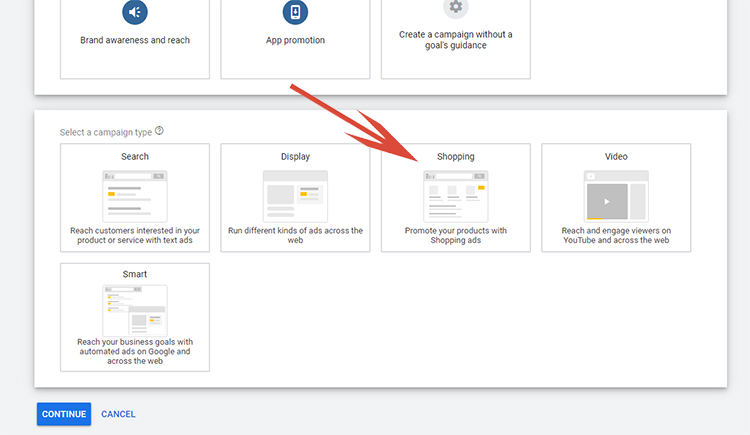
Then, you will need to select the new campaign type. For Shopping campaigns, you will want to select Shopping and the blue ‘Continue’ button.
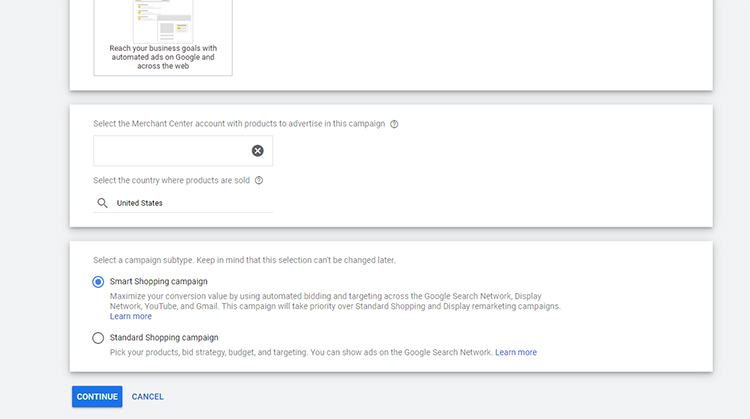
You will then need to select which Merchant Center account you wish to link your campaign; select the country where products are being sold and whether you want to run a Google Smart Shopping campaign or a Standard Shopping campaign. (Note, this selection cannot be changed once a campaign is created).
For my private clients, I manage Standard Shopping campaigns as it gives you more control over where and at what costs your Shopping ads will appear. However, be careful because Google defaults your option to the newly released Smart Shopping campaign.
For information on Smart Shopping campaigns, see my article – New Google Smart Shopping Campaigns – What You Need to Realize.
Google will then prompt you to name your new campaign; set your budget; select your bidding strategy and decide if you would like to use Google’s Enhanced CPC to automatically raise your maximum bid if a click seems likely to lead to a conversion.
Next, is a setting named Campaign priority. You will find this setting useful when segmenting your products within campaigns.
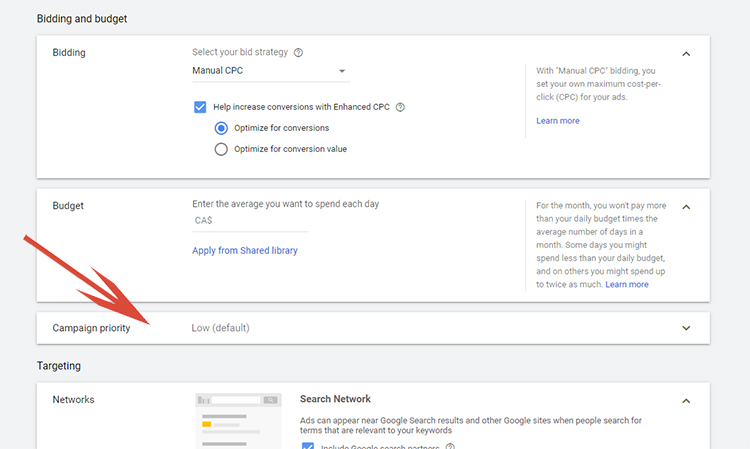
The default on Campaign priority is Low. Best-practices would recommend that this setting be changed to either Medium or High since is contains a sub-set of the full product offering.
This setting is a safeguard. If a product is contained within multiple campaigns, the product will be shown depending on which campaign has the higher bid. However, if a product is in multiple campaigns where there are different priority levels, the priority level is the determining factor for which campaign the product will be pulled.
Finally, you will want to specify which Networks you want your products to eligible to display. This is a fairly new option. Until recently, Google Shopping ads would only display within the Search Network. Now, the default is to have Shopping ads appear within the YouTube and Discover Network as well. This is a great option for increased exposure, but I have found these placements do not generate near the ROI of having products appear only within the Search Network.
For additional information on having Shopping ads appear within these networks, read my article – New Changes to Google Shopping Could Cost You Big Time!
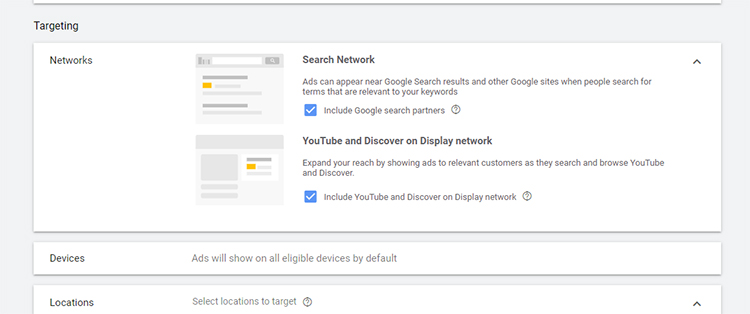
Finally, select which location to serve your ads, the start and end dates of your campaign and click on the blue ‘Save and Continue’ button.
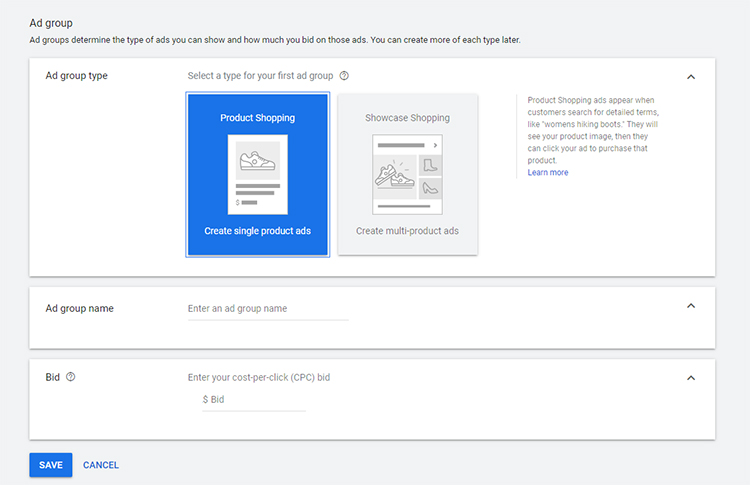
You will then be asked to select some settings for your first Ad Group including the Ad Group Type, Ad Group Name and your initial bid.
Note, the Ad Group Type – Product Shopping is the standard Shopping Ad and what I recommend for private clients.
Finally, we are ready to start determining which products should be in the campaign. By default when an advertiser creates a new campaign, Google brings in the entire product offering in the data feed linked from the advertiser’s merchant center account.
However, the point of segmenting is to include a subset of products within the new campaign. In order subdivide, click on the + symbol next to the All products.

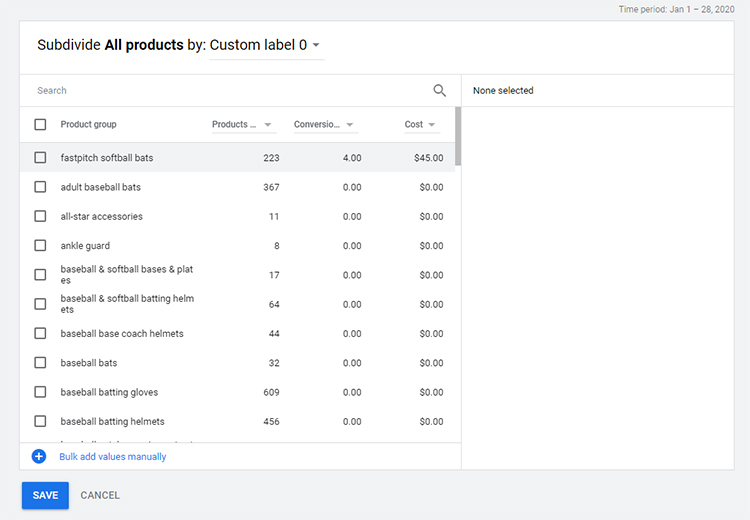
A window will then pop-up allowing retailers to subdivide according to fields they have populated within their products that are currently approved within Google Merchant Center Account. (Again for a refresher on setting up a feed, review my article – Google Shopping – What It Is, How It Has Changed.
In the example below, I am looking at the feed subdivided by Custom_label 0, which for this particular feed contains the different categories as seen on the website.
In order to add a subsection, simply click the box adding a checkmark to the right of the name and click ‘Continue To Edit Bids’. Note, multiple categories can be selected if an advertiser wishes to use the same settings for all subsections that are to be included within the new campaign.
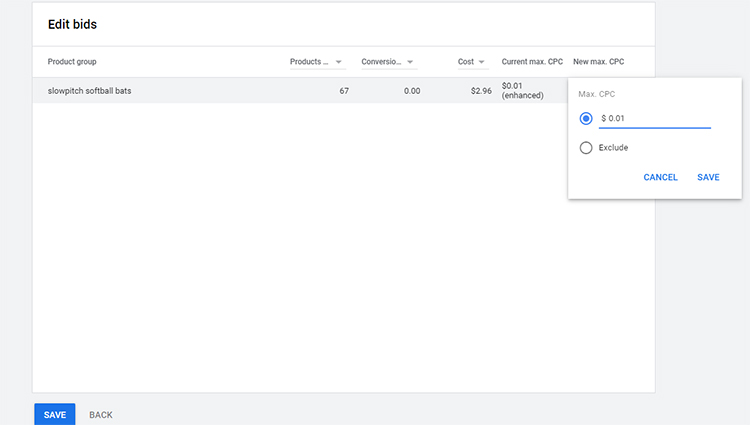
Once a subsection has been added, advertisers can adjust their bid on the entire product group.
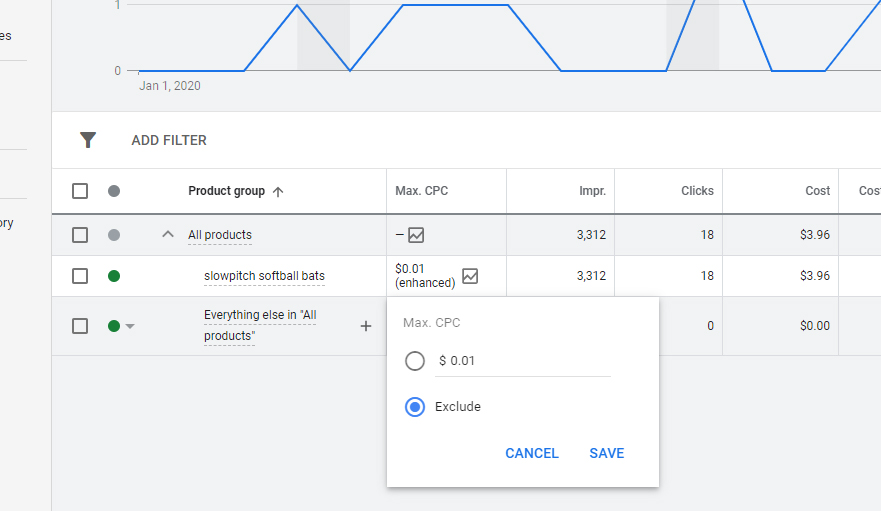
Once the subsection is added and saved, a campaign will show the subsection(s) along with another subsection named Everything else. Since we are subdividing and the rest of the products are found within the main Shopping campaign, we will not want the rest of the products or ‘Everything else’ displaying within this campaign. Therefore, we need to exclude those products.
To exclude, simply click on the bid column next to the product group that should be excluded and select the radio button next to Excluded and save.
Once you have saved properly, there should be the word in Excluded grayed out next to the Product Group that is no longer eligible to display within this campaign.
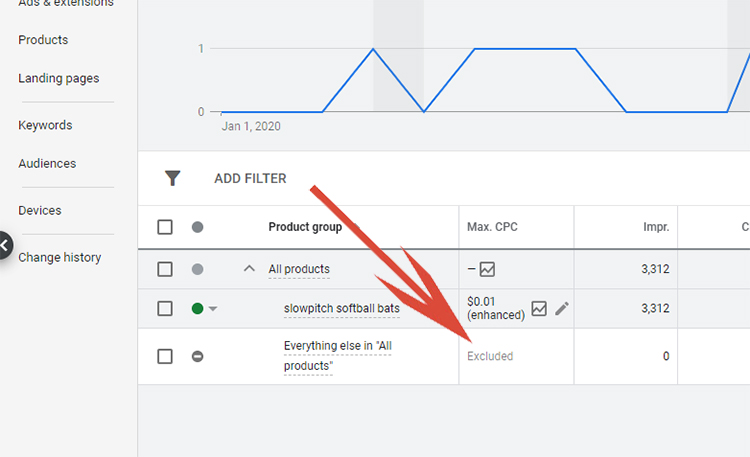
That is it, the new campaign has been created with the desired subsection of products and settings can now be optimized based on these products rather than by all products that were originally in the main Shopping campaign.
A best-practices tip here – although setting a high priority level setting should prevent products being shown in other campaigns, I always recommend excluding the newly created subsection in other campaigns that you do not wish for those items to be shown. In order to exclude those products, navigate to the main Shopping campaign and follow the same steps as above, only this time excluding the subsection that is now in the new Shopping campaign.
Final Word
Obviously the newly created campaign will not have historical data needed to optimize, but it will populate over time. Once the data starts coming in, there are 3 ways to change bids based on results all which have the potential for impactful results in the new campaign. These 3 ways to optimize include: Locations, Ad Schedule and Devices.
If you have taken time to have a plan when mapping out your data, you will most likely find that the way you want to optimize these areas of bidding along with the negative keywords that you add will be different between campaigns. Being different is one of the ways why it makes sense to segment product data into different campaigns. For those with a substantial number of product offerings, just like classic search campaigns, segmenting your product offerings will greatly outperform a non-segmented campaign.
With Shopping ads, Display ads (particularly retargeting) along with Search ads, advertisers have the ability to advertise their product offerings in a variety of different ways.
When deciding which method of advertising is viable for an advertiser’s business goals, an advertiser must closely monitor results in terms of costs vs sales in order to optimize accounts that generate the most profitable ROI.
Google Shopping is an effective tool for doing this, but it must be properly configured in order to fully optimize results. Segmenting Shopping campaigns with the steps above is an advanced technique that can help to generate an ROI, but like the setup of most campaigns requires work and constant monitoring. Perhaps this is why it has the ability to generate such great results, because the vast amount of advertisers are not taking the effort to employ this tactic. Thus, leaving opportunity for those who are willing to put in the effort to fully market their products using all the tools available in Google’s every changing Ads platform.
Looking for More Information on Google Advertising?
Check out the all new The Academy of Internet Marketing (www.theacademyofinternetmarketing.com), the premier online marketing destination for small to mid-sized e-commerce businesses serious about substantially growing their online sales plus exclusive access to me, author of Make Each Click Count, The TOP Guide To Success Using Google AdWords.
If you have the dedication and are ready to take your online sales to the next level, then The Academy of Internet Marketing was created for you. It provides the tools in the form of knowledge of what works today. Join us and see what makes us special and together we will grow your business.
If you are ready to take your online advertising to the next level, I welcome you to take a trial. It only costs $1 for access.
Happy Marketing!
Andy Splichal
ABOUT THE AUTHOR:

Andy Splichal is the founder of True Online Presence, the founder of The Academy of Internet Marketing, author and certified online marketing strategist with twenty plus years of experience helping companies increase their online presence and profitable revenues. To find more information on Andy Splichal, visit www.trueonlinepresence.com or read The Full Story on his blog, blog.trueonlinepresence.com.
