Each time an advertiser creates a new campaign, the first step is to select campaign settings. Selecting a campaign’s settings needs to be done prior to adding either keywords or ads. Although it may sound like a mundane task, proper settings are essential for a campaign to receive optimal clicks at the lowest possible costs.
Below we will focus on each initial Google setting available and when and where advertisers should use different options as well as recommended best-practices.
In order to launch a new campaign, click on the red + Campaign button. A drop down list will display the types of campaigns Google offers. Current campaign types include Search Network with Display Select, Search Network only, Display Network only and Shopping.
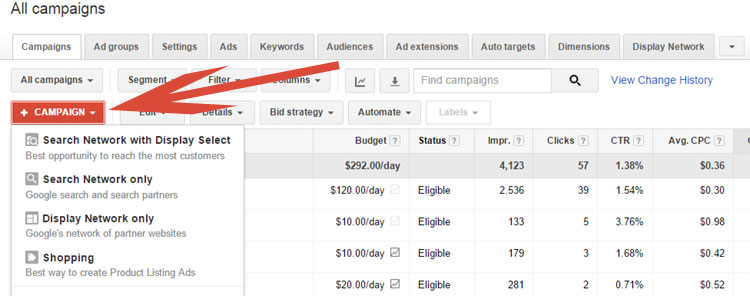 Search Network controls the ads that are triggered when a user does a search query on Google or one of Google’s Search Partners. Search results that are eligible to display come from advertisers that opt in to Google’s Search Network. Google Search Network is the most popular setting and typically what most advertisers think of when advertising on Google. The ads in the Search Network are displayed above and to the right of organic (free) listings.
Display Network, formerly known as Content Network, allows advertisers to place their ads on all Google’s partner websites when a user is looking at a webpage related to an advertiser’s product.
Example, an advertiser is a dentist and a user is browsing a website in Google’s Display Network and reading an article on dental implants, the advertising dentist’s ads in this example would be eligible to be displayed if they have opted into Google’s Display Network.
Google Shopping is relevant for ecommerce advertisers only, not professional service advertisers. Google shopping are product results displayed on the right of the page when a user does a Google search as well as the results found within the Google Shopping tab. For more information on Google Shopping, read our previous blog post – Google Shopping – What It Is, How It Has Changed.

Next, an advertiser will need to name their new campaign and select the type of campaign. In the example below, I selected Search Network only (the most popular) and enabled All Features. The default for the campaign type is Standard, however the standard setting does not allow advertisers to take advantage of tools such as location bid adjustments, ad scheduling, ad rotation, dynamic search ads or campaign URL options.
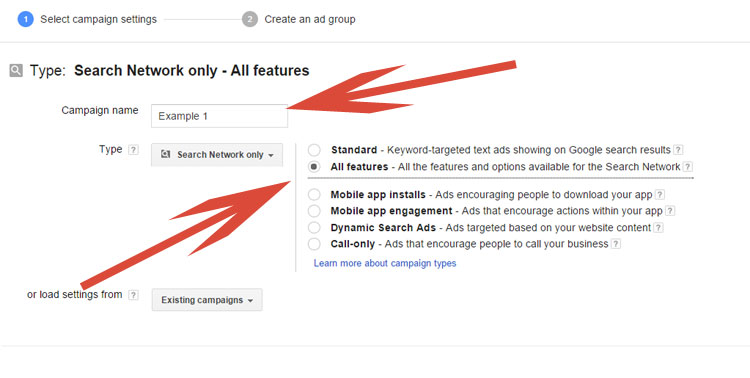 There are also lesser used options available next to campaign type including Mobile app installs, Mobile app engagement, Dynamic Search Ads and Call-only ads. These options are used by very few advertisers so we will not go into detail at this time, but if interested contact us for more information.
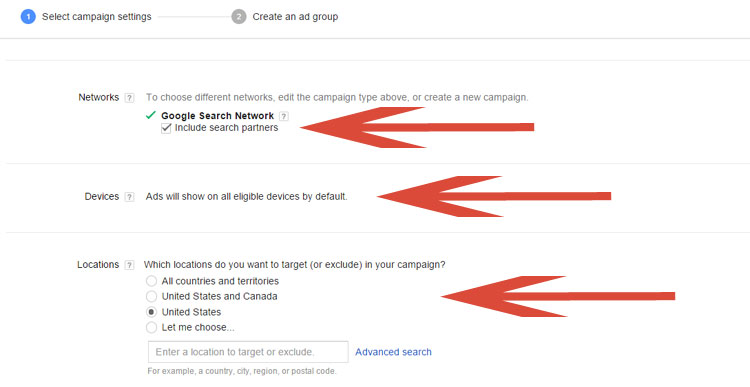
Advertisers are then asked to select whether they want ads to be eligible to appear on Google Search Network only or also to be included on Google’s search partners. Google search partners include thousands of Google partner websites that display Google search ads. Note, this is an all or nothing option. Advertisers cannot opt in or opt out from a specific search partner or see detailed results from specific search partners.
For Professional Service advertisers, I typically recommend turning off, while for ecommerce advertisers I recommend leaving the option enabled. For detailed information on why, see our post – When Advertising With Google, Where Are You Really Advertising.
Next, on the screen is a Devices field. This is a bit odd in the fact that Google does not allow an advertiser to adjust their bid on devices at this point in the setup process. In order to adjust bids, an advertiser must go into the Settings tab once the campaign has been configured. Note, Google’s default is to have the same bid across all devices. It is highly recommended for advertisers to monitor results of mobile, tablet and desktop devices closely in order to make necessary bid adjustments that are often needed to increase profitability.
Finally, this image shows the location option which controls where an advertiser would like to have their ads eligible to be displayed. The default from Google is to display in both the United States and Canada, but this option can be adjusted to include either All countries and territories, United States or an advertiser can target or exclude specific locations. While important for all advertisers to ensure they are advertising only in areas they can offer their products, this feature is vital for Professional Service advertisers that generally have smaller service areas.
 Scrolling further down on the page, an advertiser must select language preference, bid strategy, default bid and budget.
Most are self-explanatory as an advertisers needs to determine how much they are willing to spend on their new campaign both daily and per click.
The bid strategy has a few more options. Advertisers have the ability to either manually set their own bids or have Google set the bids within the confines of a daily budget.
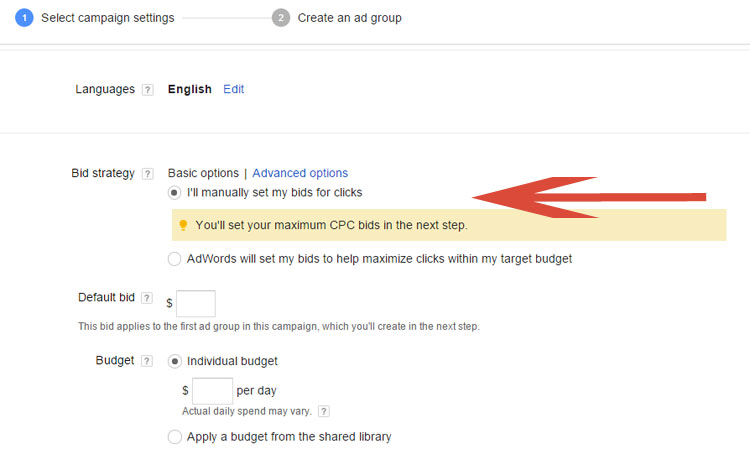 Below that, we come to the delivery method option. This option allows advertisers to determine if they would like their ads spread out throughout the day based on their budget (standard option) or if they would like their ads shown as fast as possible based on user’s search behavior (accelerated option). Although Google recommends the standard option, it depends on the advertiser, their business and their budget. This is definitely a setting worth testing.
Finally, this brings us to the end of the settings and to the final options of Ad Extensions and Advanced Settings.
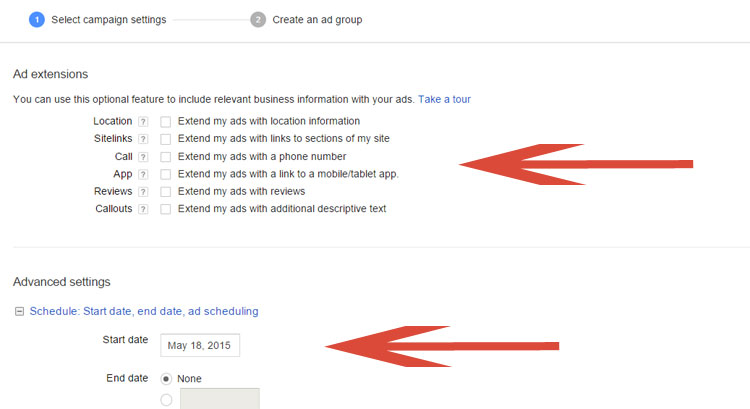 Ad Extensions are extra pieces of information that Google allows advertisers to append to the end of their ads. Current ad extensions include location, sitelinks, call, app, reviews and callouts. Ad Extensions have been found to positively affect CTR (click through rates) and are recommended to test. Which ad extension is going to be the most successful will depend on each advertiser, their vertical and their product offerings. For a complete list of best-practices regarding the use of ad extensions, see our YouTube video – Pay Per Click Advanced Technique 2 – Ad Extensions.
Last but not least are the advanced settings. Here an advertiser can setup ad scheduling, ad delivery rotation, dynamic search ads and campaign URL options. Note, only if an advertiser initially has changed the campaign from Standard features to All features will advanced options appear at the bottom of the page.
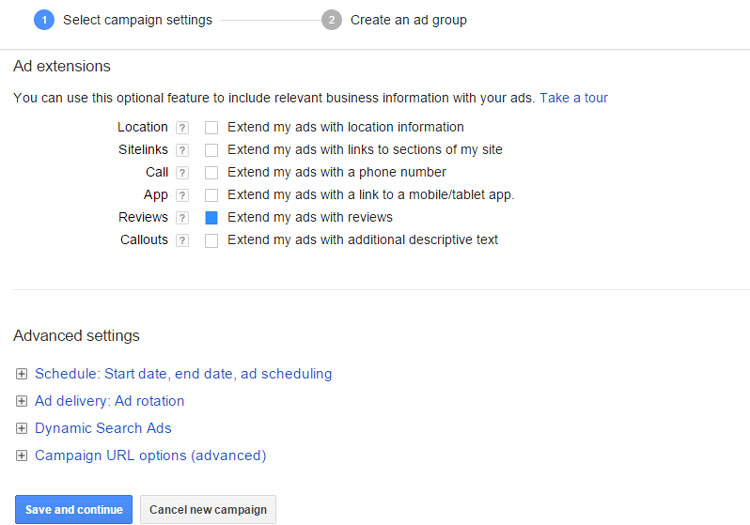 Once complete with the settings page, click on the Save and continue and Google will direct you to the next piece of the campaign – creating keywords and ads.
Although it is a good habit to set up a campaign correctly from the beginning, note that it is possible to change campaign settings after the campaign has been built by clicking on the settings tab. Creating optimal settings will be different from advertiser to advertiser. However by fully understanding and selecting what are the best options for each campaign, settings can have a dramatic effect on ROI (rate on investment) along with overall account profitability.
 Still need help or looking for someone to bounce ideas off? We are currently offering free marketing strategy sessions to those interested. Call True Online Presence at 1-888-456-6943 to schedule.
Happy Marketing!
Andy Splichal is an online marketing strategist with more than a decade and a half of experience helping companies increase their online presence and profitable revenues. Although this blog focuses on driving profitable traffic through Google AdWords, True Online Presence offers additional services for lead generation as well as other proven marketing strategies customized for each client.
