
When an advertiser initially creates a Google AdWords account the interface may look intimidating. Google has multiple menus and sub-menus on the top, in the middle and to the left of an account interface. It is important for an advertiser to learn what each menu controls in order to fully optimize their account and implement advanced strategies that I share throughout my blog. However, this post features the basics detailing what everything is and where it is located.
For those advertisers already familiar with the Google interface, I warn against dismissing this blog post too early. Who knows? By reviewing the basics, perhaps there is a gem to be discovered!
Google AdWords’ Top Menu
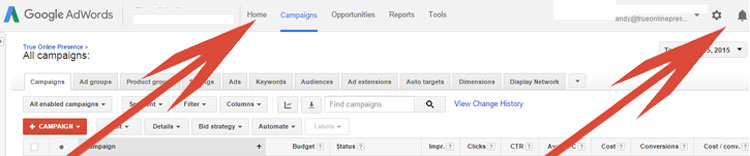
Google’s top menu includes the following text links: Home, Campaigns, Opportunities, Reports and Tools. In addition, the top menu includes two icon links: a gear icon that serves various administrative functions and a notification bell.
 Home Link –
The Home link provides an overview (or will once data is available) of the account. Like most Google sections, the Home section is highly customizable allowing advertisers to subdivide and analyze their past data using a variety of attributes with controllable date ranges. By default the Home interface also displays various useful reports including: ‘Good quality but low traffic keywords’ report; ‘Keywords below first page bid’ report; ‘All enabled keywords’ report; ‘All non-active keywords’ report; ‘All enabled campaigns’ report; ‘All non-active campaigns’ report; ‘All enabled ad groups’ report and finally ‘All non-active ad groups’ report. All of these reports can be customized using a selection of performance and conversion attributes.
The Home interface provides an overall look into the health of a campaign which savvy advertisers would be wise not ignore. The above listed reports are an effective way advertisers can view insights of the account at a snapshot level.
Campaigns Link –
The Campaigns link is the default view when opening an AdWords account and where advertisers typically focus the majority of their efforts. Within the Campaigns link, various tabs control how an account is organized, what keywords trigger their ads and the ads themselves. It also includes a variety of different tabs that determine when a user will see an ad and how much it will cost if a user clicks on an ad.
Tabs currently listed under the Campaigns link include: Campaigns, Ad Groups, Product Groups (shown only when a Google Shopping account is enable), Settings, Ads, Keywords, Audiences, Ad extensions, Auto targets, Dimensions and Display Network. Each tab is a lengthy discussion, but here we will focus on the basics with links to a various blog posts that provide additional details on each.
 Campaigns Tab –
Google uses a hierarchical system to organize accounts. The highest level is Campaigns. Within a Campaign, advertisers are allowed to subdivide into Ad Groups where the keywords are added, stored and keyword bids are managed.
As a best-practice, only similar Ad Groups should be listed under the same Campaign, because settings typically are used to control at the Campaign level. Settings controlled at the Campaign level include: status, budget, language, eligible networks, campaign start and end date, ad schedule, eligible devices, location and bid strategy.
Within the Campaigns tab, advertisers can add and remove campaigns. In addition, advertisers can view data on all Campaigns simultaneously and have the ability to segment data, filter data, customize columns, edit status, change budgets, view auction insights, change bid strategies and automate by creating various rules for Campaigns. Finally, in the Campaigns tab, advertisers can also download reports and view Campaign change history.

When viewing the Campaigns tab, Campaigns can be sorted by name, budget, status, impression, clicks, cost or any of the other attribute columns displayed. In addition, advertisers can customize columns using the Columns drop down and modifying columns option. This feature allows advertisers to add an array of attributes, each which will allow data to be sorted.
The broadest of views, the Campaigns tab provides an overall look at an account and should be used to examine historical data leading to broad changes that will affect the Ad Groups and Keywords found within each Campaign.
Ad Groups Tab –
Ad Groups are subsections of Campaigns. The Ad Groups tab displays all Ad Groups regardless of under which Campaign they are organized. Similar to the Campaigns tab, the Ad Groups tab allows data to be segmented, filtered and downloaded. The Ad Groups tab also includes the ability to customize and sort columns using a vast list of attributes similar to the Campaigns tab.
The Ad Groups tab allows a closer look at historical data versus viewing data in the Campaigns tab. Particularly helpful for advertisers with numerous Ad Groups within various Campaigns, the Ad Groups tab allows advertisers to quickly identify both successes and problems. Proper optimization needs to be based on historical data and by using the Ad Groups tab advertisers can quickly discover what is working and what is not working and optimize accordingly.
Products Groups Tab –
Next, is Product Groups tab. Product Groups are similar to Ad Groups, except designed for Google Shopping opposed to Google Search. Product Groups are how Google Shopping campaigns are subdivided and will only appear when an advertiser has at least one Shopping campaign enabled. Just like the Ad Groups tab, the Products Group tab allows advertisers to filter data and download reports. Columns are able to be modified to include an array of attributes and can be used to sort data.
The Products Groups tab is useful for looking at Shopping campaigns on a snapshot level with useful statistics that include impression share, benchmark CTR (how other advertisers are performing on similar products) and benchmark CPC (what other advertisers are bidding on similar products). By reviewing what competitors are doing, advertisers can determine based on their historical results whether current bids are competitive.
Settings Tab –
Proper Settings are essential in laying the groundwork for the success of an account. Without proper settings in place, it becomes difficult to achieve account profitability regardless of how well the other Campaign tabs are optimized. For details about properly formatting a new campaign review my blog post – Proper Settings, The First Step To Successful Google Advertising.
Once Settings are configured, the Settings tab becomes important as a snapshot for all Campaigns. Current Settings can be reviewed based on status, budget, language, networks, start date, end date, ad schedule, device, location and bid strategy. These attributes allow advertisers to quickly access information about important metrics in all of their Campaigns opposed to needing to view each Campaign’s settings individually.
Like with the previous tabs, the Settings tab allows advertisers to modify columns and filter based on data displayed.
Ads Tab –
Using the Ads tab, advertisers control how their ads appear. When clicking first on the Ads tab, all ads are displayed. By first clicking on a specific campaign and then the Ads tab, only ads for that Campaign will display. Likewise, by first clicking on an Ad Group and then the Ads tab, only ads for a specific Ad Group will display.
Ads are a vital part of any successful Google AdWords account. They are the first and many times only impression your company shares with potential users and ads are what convinces users to visit your website rather than your competitors. Creating compelling ads takes practice and testing, but it can be achieved. For a description on writing successfully ad copy refer to my blog post – Creating Effective Ad Copy in Google AdWords.
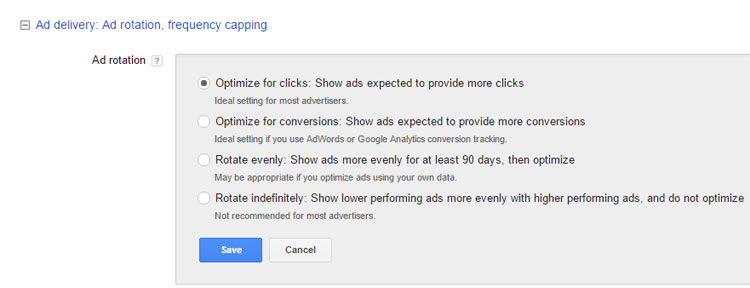
Once an ad has been written, it is important to test results. When an advertiser has multiple ads available for display, they can use the Google system to either Optimize for clicks (Google’s default); Optimize for conversions; Rotate evenly for 90 days and then optimize or Rotate indefinitely.
The option for rotating ads is found in the Settings tab, but I’m mentioning under this section since it is a vital piece of optimizing ads. To access Ad rotation under the Settings tab, scroll down to Ad delivery: Ad rotation, frequency capping and click either the + to expand the selection or the Edit link if an Ad delivery selection has already been set.
 Once an advertiser has determined how they wish to rotate their ads, they should return to the Ads tab to create new ads and manage existing ads.
Within the Ads tab just like within the Campaigns and Ad Groups tabs, advertisers can segment, filter and add/remove columns to display. They can also download reports, view change history, automate rules, edit existing ads or create new ads.
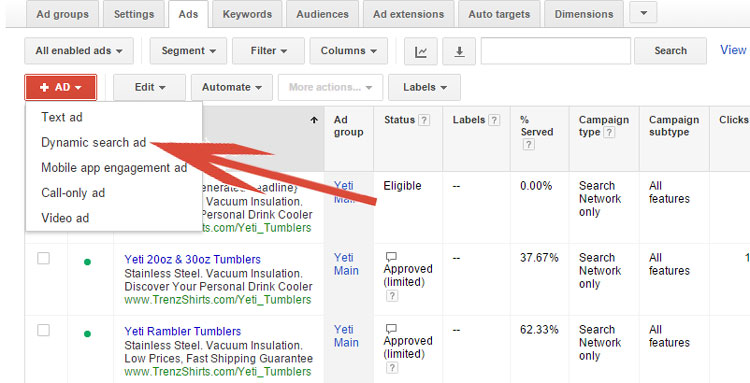
To create a new ad, click on the red + AD button. A drop down will appear providing options for the type of ad the advertiser wishes to create. Available options for new ads are Text ads, Dynamic search ads, Mobile app engagement ads, Call-only ads and Video ads.
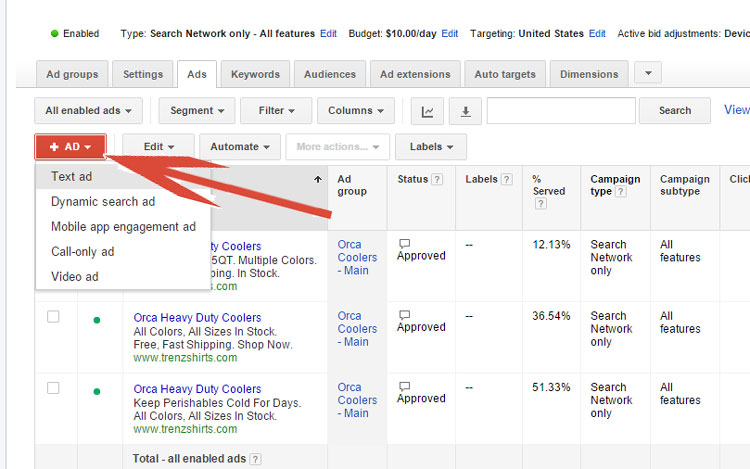
The most common ad type is a text ad. Text ads are the non-image ads that display when a user does a search on Google. When creating text ads, it is important to note that ads can be written for desktop/laptop devices or specifically mobile devices. If an advertiser plans on advertising across devices, it is important to optimize for each device as there are distinct differences which I review in my blog post – Optimizing Google Campaigns For Mobile.
Regardless of what device an advertiser is optimizing, the character limitations remain the same:
Title/Headline – 25 Characters.
Description Line 1 – 35 Characters.
Description Line 2 – 35 Characters.
Display URL – 35 Characters.
Ads can make or break the success of a Campaign. Savvy advertisers should ensure they are creating multiple compelling ads with a defined call to action and continually test multiple ads and optimize based on results.
Keywords Tab –
Keywords contained in an account will control when an advertiser’s ad will be eligible to display. Just like the Ads tab, advertisers have options in which keywords will display in their Google interface. To view all keywords in an account, click on the Keywords tab. By first clicking on a specific Campaign, only keywords for that Campaign will display and by first clicking on an Ad Group, only keywords for a specific Ad Group will display.
Before entering new keywords, an advertiser should understand keywords match type. Google currently supports five different match types: exact match, phrase match, broad match, broad match modifier and negative. In order to review how each match type works, review my blog post – Properly Using Keyword Match Types In Google Advertising.
Once familiar with the different match types and new keywords have been added to an account, advertisers can use the Keywords tab to optimize their Campaign. Within the Keywords tab just like with the Campaigns, Ad Groups and Ads tabs, advertisers can segment and filter data, download reports and customize columns. In addition, advertisers can edit keyword match type, adjust bids, add new keywords, adjust bid type and add automated rules.
Within the Keywords tab, advertisers can find one of my favorite tools for optimizing campaigns and discovering negative keywords to add to an account. Located under the Details drop down is the option of Auction insights.
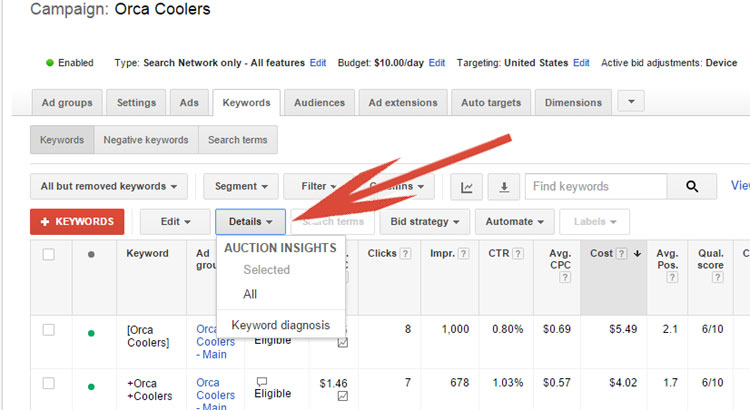 By selecting All under Auction Insights, advertisers can review what user searches generated their ads to display and which keywords the display was attributed. The date range on this view can be customized in order to discover trends and learn when and why ads are displaying. By combing through past data, advertisers can find new keywords as well as unrelated keywords that are costing budget. Use these unrelated keywords to add to the negative keywords list and prevent ads from displaying for non-optimal searches. For specific details on adding negative keywords, refer to my blog post – The Art of Adding Negative Keywords.
Savvy advertisers should concentrate a great deal of effort within the Keywords tab. For it is here that individual keywords are not only added and match type determined, but also where individual keyword bid adjustment occurs. By raising or lowering bids on specific keywords, advertisers can optimize at a granular level using historical data as an indicator of future results.
Audiences Tab –
Google defines an audience as a subset of past visitors to a website. Advertisers can use audiences to remarket ads (show ads to customers that have previously visited their website) as well as increase or decrease search bids to those users contained in an audience. For more detailed information on increasing/decreasing bids based on audience in Search campaigns, see my blog post Merging Retargeting With Search Campaigns.
Not as common, but advertisers can also use the Audience tab to exclude users contained in an audience thus preventing them from being reshown ads.
In order to use the Audiences tab, an advertiser needs to first create either an interest or a remarketing list. This list can be created either though using the Shared library link located on the left menu of the account (more about this later) or by using Google Analytics. For detailed steps in using Google Analytics to create a remarketing list, again refer to my blog post Merging Retargeting With Search Campaigns.
Once a remarketing list or multiple remarketing lists have been created and added to the Audiences tab, advertisers have the ability to segment, filter, adjust attributes shown, edit or automate with rules. The Audience tab provides advertisers a powerful way to adjust bids to those more likely to buy, a.k.a. return visitors.
Ad Extensions Tab –
Ad extensions are extra pieces of information Google allows advertisers to append to their ads. This extra information has the potential for high impact, low costs on an account’s success by leading to higher click through rates (CTR) and profitability.
Through the Ad Extensions tab advertisers can manage existing ad extensions, add new ad extensions or review past historical data with tools that allows data to be segmented, filtered and adjusted by adding or removing which attributes are displayed.
Google currently supports the following ad extensions: Sitelink extensions, Location extensions, Call extensions, App extensions, Review extensions, Callout extensions, Structured snippet extensions (new) and Automated extensions report. For a detailed description on what each ad extension does, review my blog post – When It Comes To Your Google Ads, Size Does Matter.
Each ad extension has a purpose and their importance will depend upon the advertiser who uses them. However, all ad extensions have no additional cost to use. The cost per click is the same regardless if a user clicks on an ad with an ad extension of if a user clicks on an ad without no ad extensions. Therefore, best-practices suggest testing all applicable ad extensions in order to learn what results they generate. In fact, for some advertiser’s ad extensions have been seen to improve click through rates (CTR) in the neighborhood of 30%!
Auto Targets Tab –
Auto Targets are intended for use with dynamic ads. Advertisers can use the Auto Targets tab to create auto targets based on all webpages, by category, by URL, by page title or by page content. Note, only pages that have been actively indexed by Google are available for use with auto targets.
Once an advertiser has created Auto Targets, they must ensure they have also created a minimum of one dynamic ad in order for Auto Targets to function. In order to create a dynamic ad return to the Ads tab, click on the red +Ad button and select Dynamic search ad.
 In addition to creating a dynamic search ad, for Auto Targets to be eligible to run an advertiser will also need to activate the Dynamic Search Ads in the Settings Tab. In order to enable, advertisers need to click on the Settings tab after viewing Campaign that the dynamic search ads is to run and scroll down near the bottom of the page under Advanced Settings and expand the Dynamic Search Ads.
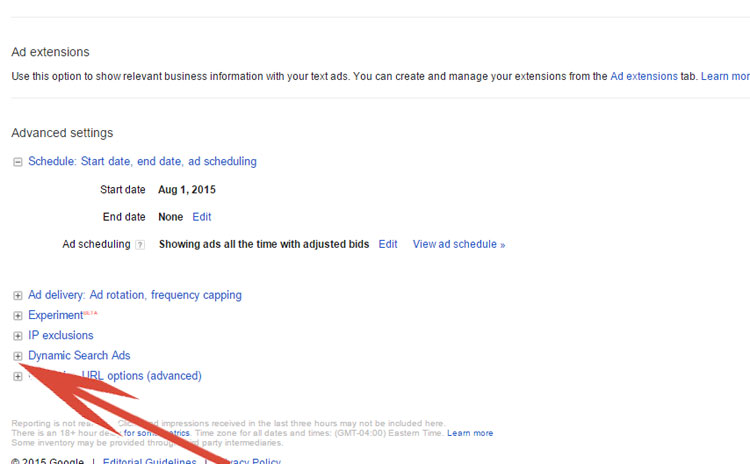
Once the Dynamic Search Ads box opens, an advertiser will need to enter the website without the http or www and select the domain language and save. This allows Google to scan the website, which is needed when using dynamic search ads.
Within the Auto Targets tab, advertisers can segment and filter data as well as adjust attributes shown by modifying columns. In addition, they can create and edit as well as review past search terms and categories. Seldom used, the Auto Target tab has the potential to provide a competitive advantage when properly implemented.
Dimensions Tab –
The Dimensions tab allows advertisers to slice and dice historical data in almost any way imaginable using historical data. Although most tabs allow advertisers to review data, the Dimensions tab goes beyond what is available in the Campaigns tab, AdWords tab and even the Keywords tab. All historical data is contained within the Dimensions tab and savvy advertisers should concentrate efforts to determine trends in order to fully optimize their account.
For examples of some best-practices when using the Dimensions tab, refer to my blog post – What Is That Mysterious Dimensions Tab In Google?
Detailed data of account history can be analyzed by popular views such as conversions, time, geographic, user location and search terms. Regardless of the view, data can be sorted from any of Google’s metrics in customizable columns. Google’s metrics which include a variety of performance, conversion and competitive metrics can be added or removed by using the modifying columns option.
The Dimensions tab is an important tool for advertisers to use in order to discover trends used for optimizing an account’s success.
Display Network Tab –
Google’s Display Network is a group of thousands of websites that are running advertisers ads created through Google AdWords. The Display Network tab is used only for those Campaigns set to use the ‘Display Network only – all features’, what Google used to refer to as Content ads. For Campaigns using either Search or Shopping, the Display Network tab is not relevant.
Within the Display Network tab, advertisers can determine various targeting methods and exclusions determining where ads should display. In addition, advertisers have the ability to target users using contextual targeting, audiences and placement targeting. The Display Network tab once Display Network ads are running can be used to analyze past results based on either the Ad Groups or Campaigns contained within the Display Network.
Being able to create Display Network keywords, control placement along with the ability to view and manage demographics allows advertisers the needed ability to optimize their ads running in Google’s Display Network similar to tools provided for ads running in Google Search.
Opportunities Link –
Now that we have explored all the tabs contained within the Campaigns link, we will shift focus back to the top navigation links. The next text link in the top menu is the Opportunities link. Within the Opportunities link, Google provides accounts with automated suggestions. Common suggestions include lowering and raising bids, adding new keywords, setting location bid adjustments, creating new ad groups, raising and lowering budgets and suggestions for changes to ad copy.
Although it is best-practices to review the opportunities tab, keep in mind these are suggestions from Google that typically lead to increasing budget. An advertiser should never blindly follow Google’s suggestions, but if suggestions are implemented remember to always monitor and test. It is an advertiser’s responsibility to optimize their own account’s success and sometimes I have found Google’s “Opportunities” to be counterproductive with bottom line results.
Reports Link –
The Reports link provides access to a highly customizable section that allows advertisers to view and generate reports containing any and all historical data based on customizable time ranges. Reports can be displayed as tables, line charts, bar charts or pie charts and are easily exported. Generated reports can be emailed to multiple email addresses or downloaded and saved.
Google currently offers 15 predefined reports that include Basic, Time, Conversions and Geographic. Each report can be customized and sorted by displayed attributes. For more advanced marketers, reports can be generated from scratch, viewing only the attributes needed for their use by utilizing a simple drop and drag interface. All reports are easily saved once created, making them quickly accessible for future use.
The Reports link provides a great tool for marketers to review and share account progress and a useful tool in optimizing.
Tools Link –
The Tools link provides access to the following tools: Change History, Conversions, Attribution, Google Analytics, Google Merchant Center, Keyword Planner, Display Planner and Ad Preview and Diagnosis.
Change History – Stores and reports all changes performed within an account. A useful tool when determining reasons for why noticeable result changes might have suddenly occurred within a Campaign, Ad Group or Keywords. Many changes are reversible when viewing Change History and can be reversed by clicking on the arched arrow under Undo status. However, note that some changes cannot be undone and if there is no arrow present that is the case.
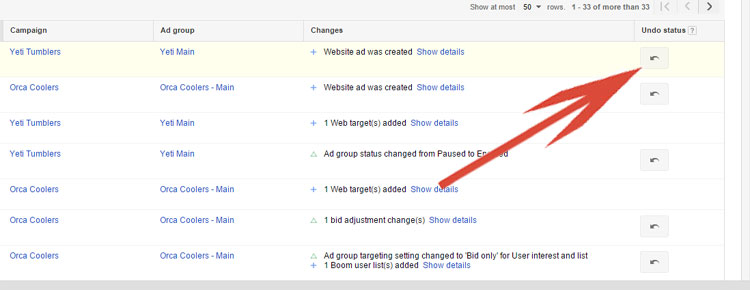 The Change History view has the ability to filter results based on Ad changes, Bid changes, Budget changes, Keyword changes, Status changes and Targeting changes.
Conversions – The Conversions tool allows advertisers to control how conversions are counted in Google AdWords. Conversions depend on advertising goals that can range from the sale of a product to a phone call or completion of a web form. Regardless of what the conversion, it is important to create conversion tracking in order to properly optimize an account. For advanced marketers, this section also provides a tool for importing Google analytics goals and transactions.
Attribution – Attribution can be found under the Tools link as well as within the Conversions drop down. Within the Attributions tool, advertisers can view data detailing the conversions goals and what actions customers performed before converting.
Google Analytics – A link to Google Analytics. Google Analytics is a free analytics program provided by Google to AdWords advertisers. Formerly a fee based analytics tool named Urchin, Google purchased in April 2005 and has since offered it at no charge to advertisers. Through Google Analytics, advertisers have the ability to review user behavior within their website. An extensive program, Google Analytics allows advertisers to optimize and find holes in their conversion paths and is a powerful tool in website and conversion optimization.
Google Merchant Center – A link to Google Merchant Center. For advertisers to be eligible to advertise in Google Shopping they must first open a Google Merchant Center account, upload a data feed and link that account to their Google AdWords account. This Google Merchant Center link under the Tools link allows advertisers to open their Google Merchant Center account directly from the AdWords interface (assuming the Merchant Center account has been linked).
Keyword Planner – This tool uses the Google database to provide details on building new or expanding existing campaigns. Ideal for laying the groundwork, the Keywords Planner allows advertisers the ability to search for new keywords, plan budgets and receive forecasts regarding new keywords. Google also provides estimated CPC, average monthly searches and competition level for suggested keywords. Recommendations are based on advertiser’s criteria and once created they are able to be saved and downloaded or they can easily be added to an account.
Display Planner – Similar to the Keyword Planner tool, the Display Planner tool is designed for ideas on running content ads in Google’s Display Network. The Display Planner tool provides advertisers with ideas to get started, impression updates and historical costs. All recommendations are easy to export and share within an organization.
Ad Preview and Diagnosis – This tool allows advertisers to perform searches to see how their ads are appearing when users do a search on Google.com. However, rather than going to Google and performing a search, when using the Ad Preview and Diagnosis tool Google does not count the impression. Not creating an impression is important because Google tracks each time there is an impression where an advertiser’s ad displays and whether or not it is clicked. Numerous impressions without an ad click can lower the quality score for an ad. For more information on quality score, review my blog post – Why Google Advertisers Need To Know Their Quality Score.
Another advantage of using the Ad Preview and Diagnosis tool rather than performing a search directly on Google to view ads is that by searching on Google advertisers will only be able to view how ads appear from their location with the device they are using. With the Ad Preview and Diagnosis tool, advertisers can view how their ads appear from any location or device. Finally, advertisers who use the tool will see their ads highlighted in blue with a note of whether or not an ad is currently displaying.
Gear Icon –
Located in the upper right of a Google account is a gear icon. By clicking on the gear icon it displays a list of administrative functions for an account including: Billing, Account Settings, Linked Accounts, Send feedback and Help. In addition, the Gear icon drop down displays Google’s toll free number used to access their help desk.
Billing – Used to access and advertiser’s transaction history, billing settings and billing profile.
Account settings – Used to access account access, linked accounts, notification settings and preferences.
Linked accounts – Also accessible under Account settings, Linked accounts allows advertisers to link data from existing Google accounts including Google Analytics, Webmaster Tools, Google Play, YouTube and Google Merchant Center.
Send Feedback – Allows advertisers to quickly send a message to Google’s AdWords team for suggestions, ideas and problems. Typically a Google representative will respond to inquiries within 48 hours.
Help – Used to access Google’s AdWords database of help articles along with a number for Google support, live chat and email address.
Notifications Bell Icon – Automated messages from Google regarding unusual account activity and optimization suggestions. Alerts can range from disapproved ad alerts to recommendations on increasing a specific Campaign budget. Note, notifications also may appear in text boxes when an advertiser signs into their account.
Google AdWords Left Menu –
Now that we have finished reviewing the top menu and all sub-menus, we will focus on Google’s collapsible left menu.
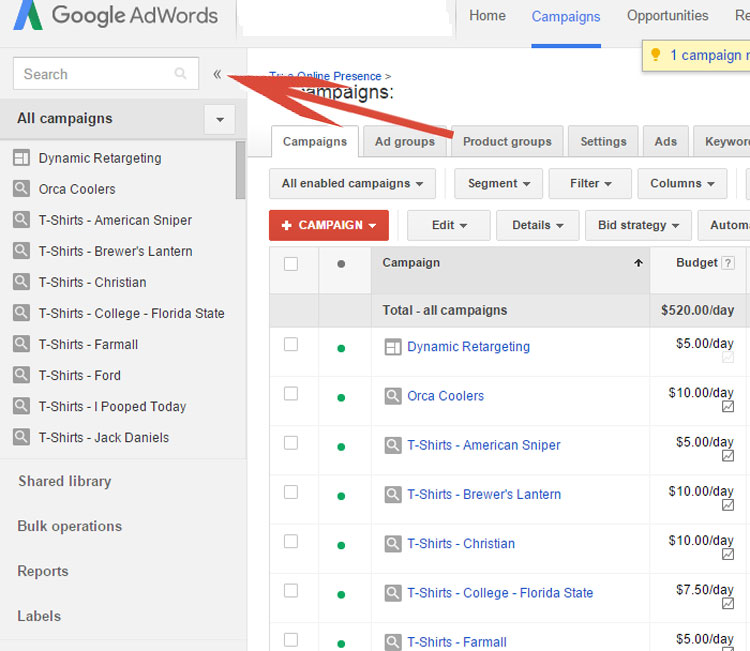
Expandable and collapsible by using the double arrows, this menu contains a search campaigns box; a hyperlinked list of campaigns and text links to Shared library, Bulk operations, Reports and Labels.
Shared Library –
The Shared library link contains advanced tools to optimize accounts. Contained within the Shared library link are sections for Audiences, Bid Strategies, Budgets, Business data, Campaign negative keywords, Campaign placement exclusions, URL options and Video remarketing.
Audiences – Allows advertisers to create remarketing list containing users that have visited their website or subsection of their website. Audiences are needed in order to launch remarketing campaigns or for use within the Audience tab as described earlier.
Bid Strategies – An interface to create and manage different bid strategies including Enhanced CPC, Target search page location, Target CPA, Target outranking share, Maximize clicks and Target return on ad spend. In this section, current bid strategies can be segmented, filtered or customized by using the customize columns tool.
Budgets – Using Budgets, advertisers can create a single budget to be shared across multiple Campaigns. This is a useful tool when Campaigns are related enough that advertisers wish to draw off the same budget, but not related enough that they have the same Settings.
Business data – Using business data, advertisers are able to link business data and feeds for use in ads, extensions or targeting. This tool works well in managing and adding various ad extensions.
Campaign negative keywords – Allows advertisers to create a list of negative keywords to be used across multiple Campaigns. For detailed information, review my blog post – The Art of Adding Negative Keywords.
Campaign placement exclusions – Ideal for use when adverting in Google’s Display Network, the Campaign placement exclusions allow advertisers to create a list of websites to be excluded from placement across multiple Campaigns.
URL Options – Allows advertisers to set account level tracking and auto-tagging. Note, if tracking and auto-tagging are set at either the Campaign, Ad Group or Ad level those settings will override what is set using URL options.
Video Remarketing – Allows advertisers to remarket with video ads to those users that have viewed their YouTube channel.
Reports –
The Reports link works in conjunction with the Reports editor located in the top menu. When using the Reports link advertisers cannot create, but rather manage existing reports.
Labels –
Labels allow advertisers to organize items in an account into meaningful subsections. For those advertisers using labels, this tool allows them to easily manage and report on labels at the Keyword, Ad, Ad Group or Campaign levels.
So that completes the tour! Tedious perhaps, important absolutely. Google provides all these tools in order for advertisers to have the ability to optimize their accounts. Sadly many of these tools are often underutilized by a majority of Google advertisers. As I continue to share advanced techniques it is important to have a full understanding of the basics and what tools are available when advertising using Google AdWords.
Still need help or looking for someone to bounce ideas off? I am currently offering free marketing discovery sessions to those interested. Call True Online Presence at 1-888-456-6943 or schedule online.
Happy Marketing!
ABOUT THE AUTHOR:
Andy Splichal is an online marketing strategist with more than a decade and a half of experience helping companies increase their online presence and profitable revenues. Although this blog focuses on driving profitable traffic through Google AdWords, True Online Presence offers additional services for lead generation as well as other proven marketing strategies customized for each client.